How to Change a Tesla Tire: The Ultimate DIY Guide
Every Tesla owner understands the prowess of this unique vehicle. However, as with all cars, you might someday find yourself faced with a flat tire. Not to worry. This comprehensive step-by-step guide is here to help you navigate the DIY Tesla tire change process.
Disclaimer: Proceed with Caution
While this guide aims to provide a comprehensive overview of the DIY Tesla tire change process, it’s essential to note a few things. First and foremost, if you’re not entirely comfortable with the procedure or lack the necessary tools, it’s always preferable to seek the assistance of a trained professional. Tires play a pivotal role in road safety, and ensuring they are correctly mounted and secured is of utmost importance.
Additionally, always refer to your Tesla owner’s manual before starting any procedure. The manual offers tailored advice and precautions specific to your vehicle model, ensuring you have the most accurate and safest information at hand.

1. Safety First: Preparing the Stage
Before diving into the nitty-gritty of how to change a Tesla tire, safety should be your foremost concern. Choose a spot that’s both well-lit and level, whether it’s a quiet parking lot or your home garage. Always make sure to engage the parking brake.
Pro-tip: hold down the ‘P’ on your drive stock just a bit longer to make sure those rear calipers are firmly locked in.
2. The Subtlety of Center Caps

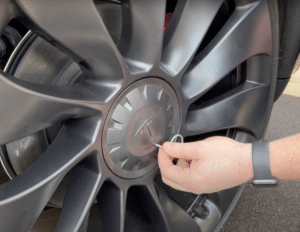
Tesla’s sleek design includes elegant center caps on many models. Your Tesla should have included a cap puller tool. It will allow you to easily remove the center cap on each wheel. Hook and then twist the tool to remove the cap.
3. Initial Steps with the Lug Nuts
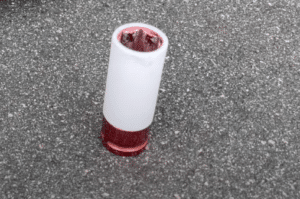
Now, to deal with those lug nuts. Using a 21mm socket, begin to gently loosen each nut. Remember, this isn’t the time for full removal. It’s all about making the later steps smoother.

4. Elevating Elegance: How to Jack a Tesla
In order to raise your Tesla, they provide ‘puck adapters.’ These puck adapters are designed to align with the car’s specific lifting points. Position them accurately. Then, with your jack in hand, elevate your car slowly and cautiously. This ensures the safety of both you and your vehicle.

5. The Heart of the Matter: Swapping the Wheel
With your Tesla now gracefully suspended, it’s time to return to those lug nuts and unscrew them completely.
Carefully remove the flat tire. Next, introduce its replacement. As you position the new wheel, use the lug nuts to hand-tighten and secure it in place. This ensures stability and alignment.
6. Descending with Care
After mastering the wheel change, the task shifts from raising to lowering the vehicle. With all in place, it’s time for a steady descent. Ensure you’ve removed the puck adapters before your Tesla touches the ground.
7. Securing the Deal: Tightening Tactics
Now, for a crucial moment. Properly tightening the lug nuts is paramount for road safety. Adhere to Tesla’s recommended specs: 175 Newton meters or 129 foot-pounds. The star pattern is your best bet for an even and snug fit. It’s always wise to double or even triple-check.
8. The Final Aesthetic Touch
Your DIY Tesla tire change isn’t complete without addressing aesthetics. It’s time for that center cap. Align the iconic Tesla ‘T’ emblem on the cap with the wheel’s valve stem, pushing it securely into place.
9. Post-Change Considerations
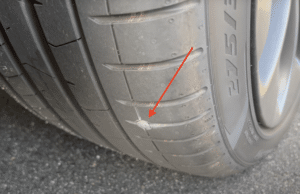
It’s crucial to remember that not every punctured tire is rendered useless. However, always exercise caution. If a puncture is near the sidewall or if the damage seems extensive, seek professional advice before reusing the tire.
Regularly inspecting your tires for wear and tear or possible punctures can save a lot of hassle in the future. Consider making it a part of your monthly vehicle checks.

Conclusion
Changing a tire might seem daunting, especially for a vehicle as sophisticated as a Tesla. But with the right knowledge and tools, the process becomes not just doable but also empowering. Remember, every step, from understanding how to jack a Tesla to ensuring the lug nuts are perfectly tightened, contributes to your safety on the road. Drive with confidence and pride! Safe travels.

